PAPER ● OPEN ACCESS Read More
Hitoshi Ohmori, Shinjiro Umezu, Yunji Kim, Yoshihiro Uehara, Hiroshi Kasuga, Teruko Kato, Nobuhide Itoh, Syuhei Kurokawa, Takayuki Kusumi, Yugo Sugawara, Shinsuke Kunimura
1. Introduction
X-ray mirrors, reflective optical elements that can reflect and focus X-ray (beams) of short wavelengths, are applied to various types of analyzers. In order to effectively characterize the optical and physical properties of X-rays, high surface precision at sub-nanometer (nm) levels of mean roughness in various types of mirror geometry is necessary. Portable X-ray elemental analyzers have been constructed based on total reflection X-ray fluorescent (TXRF) analysis, which are used in multiple fields that call for ultra trace analysis and high quality mirrors. Such mirrors are of plane (flat) geometry and small in size, requiring increased productivity due to their cost restrictions. The mirrors are also required to be accurately flat and smooth, at less than few nm in mean roughness. Materials for the mirrors can be chosen among Si, glassy carbon, and quartz glass. The strict requirements detailed above suggest that an innovative new finishing process that will maintain process number at a reasonable state, as well as attain the prescribed surface roughness and quality within a limited timeframe, is imperative.
In this study, we have developed a new grinding technique that will provide an efficient finishing process, which will allow for the practical manufacturing of total reflection mirrors dedicated to portable TXRF spectrometers.
2. Research Background
Grinding with electrolytic dressing process
A precision grinding with electrolytic dressing process which has been developed in our previous research was applied to finish mirrors; a rotary surface grinder, with air hydrostatic bearings for the wheel and work piece spindles, was employed for the experiment. The surface roughness (profile) was evaluated by the optical surface measuring instrument on each work piece (mirror), and was then averaged to be compared to different wheels and finishing methods. After grinding, CMP (chemical mechanical polishing) was added to reduce grinding marks.
Portable total reflection X-ray fluorescent (TXRF) analyzer
Figure 1 displays the portable TXRF spectrometer and its configuration which have been developed in the previous research. When the incident X-rays are totally reflected on the X-ray mirror, atoms in the analyte are excited by both the incident and reflected X-rays, resulting in the emissions of fluorescent X-rays. Then, the emitted fluorescent X-rays will be analyzed via the X-ray detector, producing a spectrum of the analyte compositions. Figure 1 also includes an internal view of the portable TXRF spectrometer. An X-ray tube with a tantalum anode was employed as the X-ray source, and quartz glass was used for the mirror.
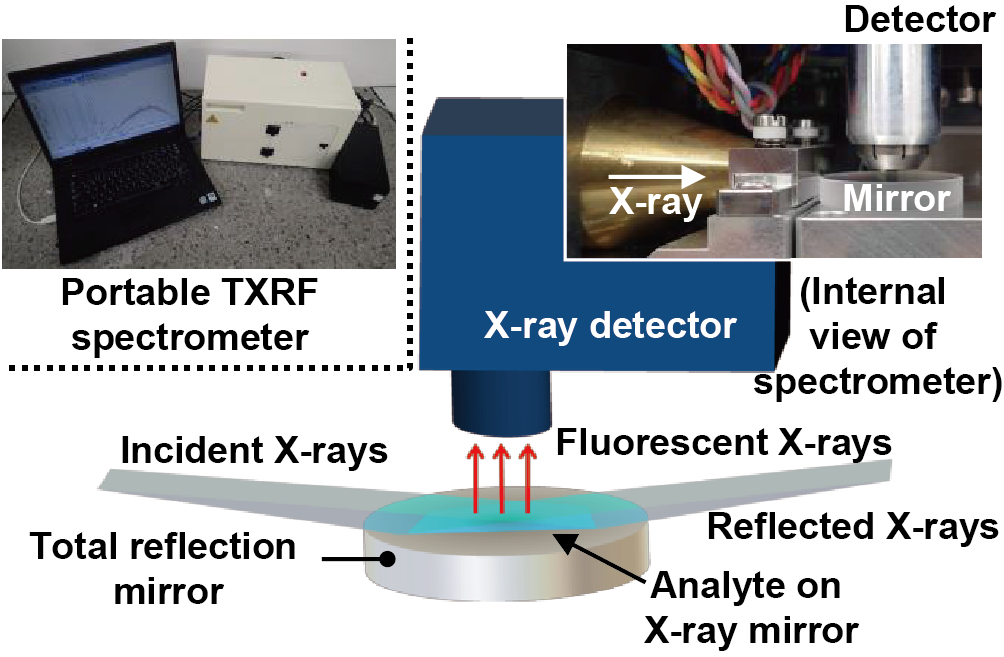
Figure 1. Portable TXRF spectrometer and its principle.
3. Recent Advances
Roughness improvement with metal resin bond grinding wheel
The arithmetical mean height (Sa) and maximum height of scale limited surface (Sz) data, which were produced with #4000 metal (cast iron) bond wheels and with #4000 metal resin bond wheels, were evaluated. Compared to metal (cast iron) bond wheels, metal resin bond wheels can more effectively reduce roughness (figure 2). While a #4000 cast iron bond wheel was able to achieve an Sa and Sz of 17.6 nm and 785 nm respectively, Sa and Sz were 11.9 nm and 553 nm respectively after applying a #4000 metal resin bond wheel.
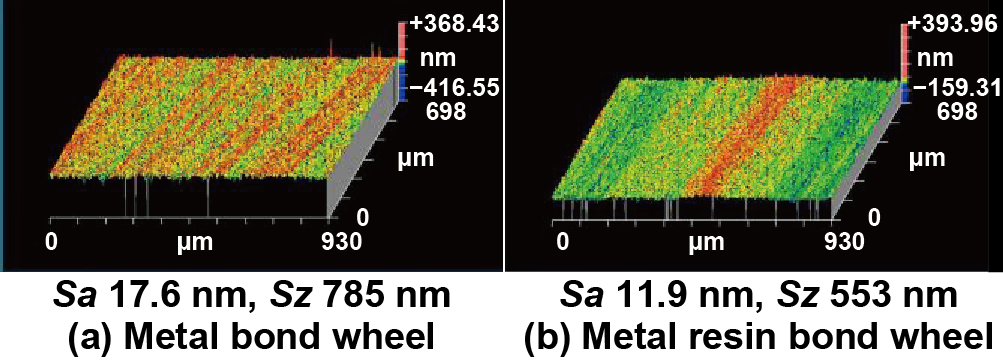
Figure 2. Surface profiles produced by #4000 wheels.
Effect of nano-diamond (ND) contained grinding wheels
Grinding experiments for mirrors were conducted by applying the fabricated #20000 wheels both with and without ND. The results confirmed that the addition of ND decreased the ground surface roughness as presented in figure 3. The Sa value without ND was 5.84 nm. Those with 2% ND, however, were able to achieve a surface roughness value that was 1/3 of those without ND. Although further research is needed to investigate its mechanisms, for the purposes of this study, it can be concluded that ND contained wheels can be applied to produce higher quality mirrors.
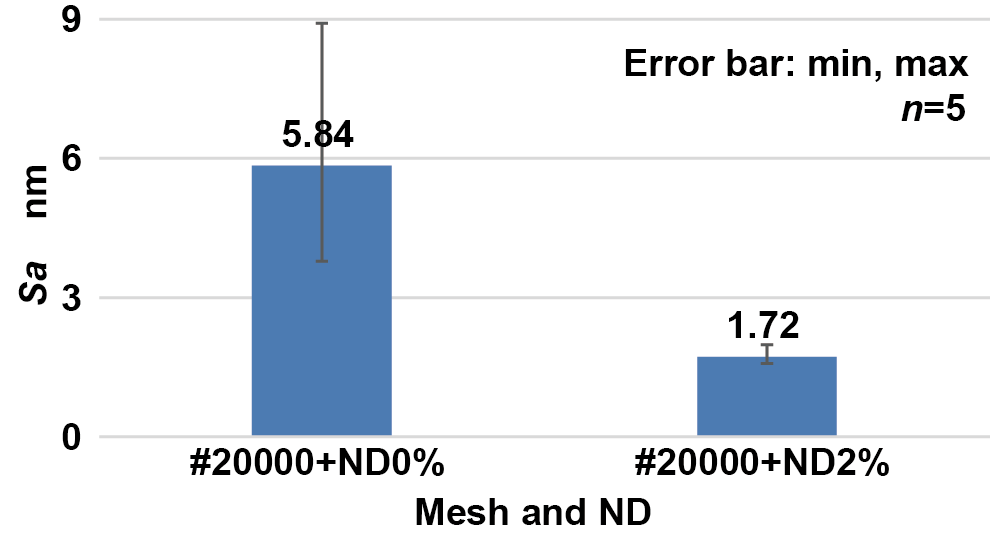
Figure 3 Reduction effect on roughness by addition of ND to wheel.
Improvement of surface quality by simultaneous grinding
In order to improve the surface quality of mirrors through the grinding process, simultaneous grinding has been attempted. As displayed in figure 4, mirror work pieces have been simultaneously ground together with a cemented carbide ring. As a mirror work piece was placed in the central area of the jig plate, the WC-Co ring was placed in the peripheral region of the same jig plate. Using this configuration, a mirror work piece was simultaneously ground with the WC-Co ring. The surface profile examples produced by the #20000 wheels contained ND 0 and 2% are shown in figure 5. Mirrors containing ND and produced under simultaneous grinding had weaker grinding marks.
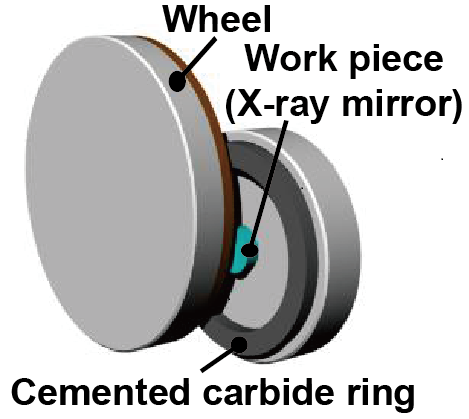
Figure 4. Simultaneous grinding method
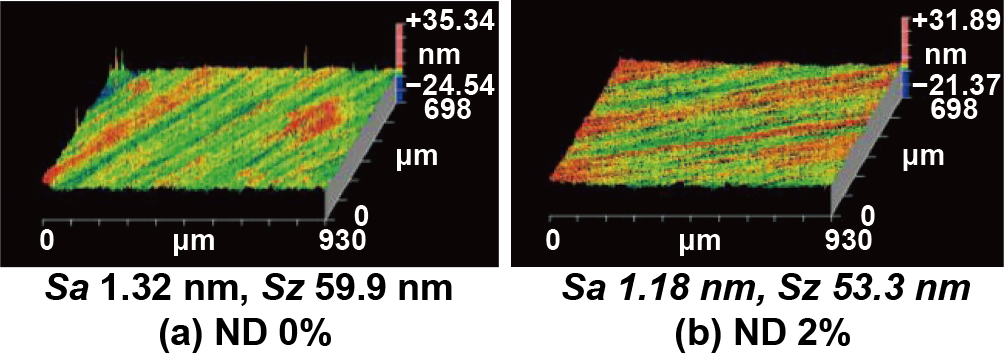
Figure 5. Surface profiles produced by #20000 wheels.
Evaluation of produced X-ray total reflection mirrors
The developed portable total reflection X-ray fluorescent (TXRF) analyzer was used by applying the finished mirrors. The detection limits of Mn and Co with the #20000ND mirror were 31 pg and 25 pg respectively (figure 6 (b)), and those with the CMP mirror were 35 pg and 30 pg respectively (figure 6 (c)). The difference in the detection limits between #20000ND and CMP mirrors may derive from variations that can arise in the measurement process. The results signify that the quality of the #20000ND mirror is sufficient to be practically applied to the portable spectrometer.
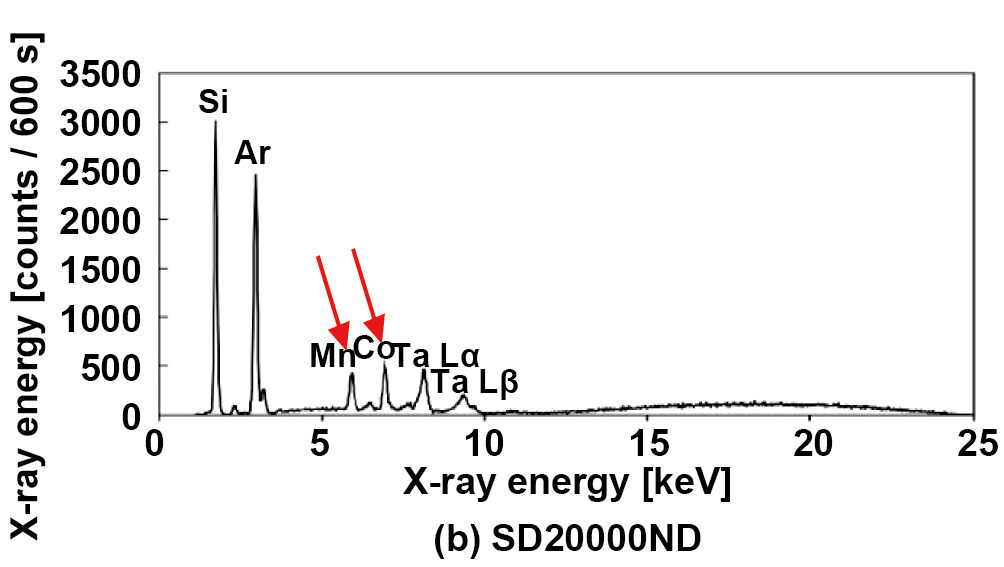
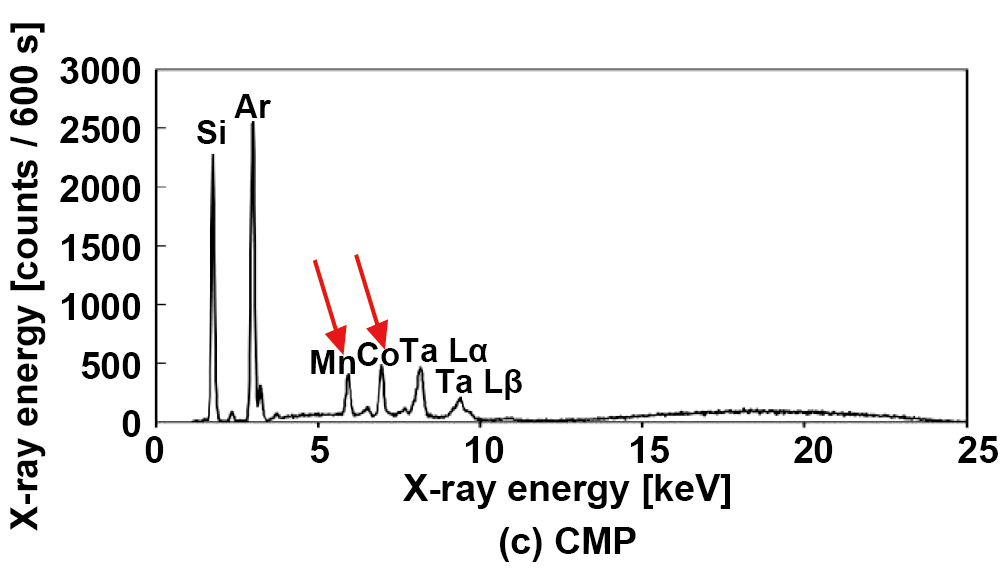
Figure 6. Evaluation of mirrors on X-ray fluorescence spectroscopy.
4. Future Prospects
Figure 7 compares the finishing process among the three mirrors. The #20000ND mirror can be fabricated through an adequate process combination of consistent grinding sequence to provide sufficiently high performance with both abbreviated process length and time. The experiment in this study has successfully demonstrated that the final finishing through simultaneous grinding of #20000ND in a consistent grinding sequence can both effectively and practically generate sufficiently high mirror quality. The grinding process developed in this study is expected not only to shorten manufacturing time of mirrors and optical elements but also to produce curved optics for various kinds of application.
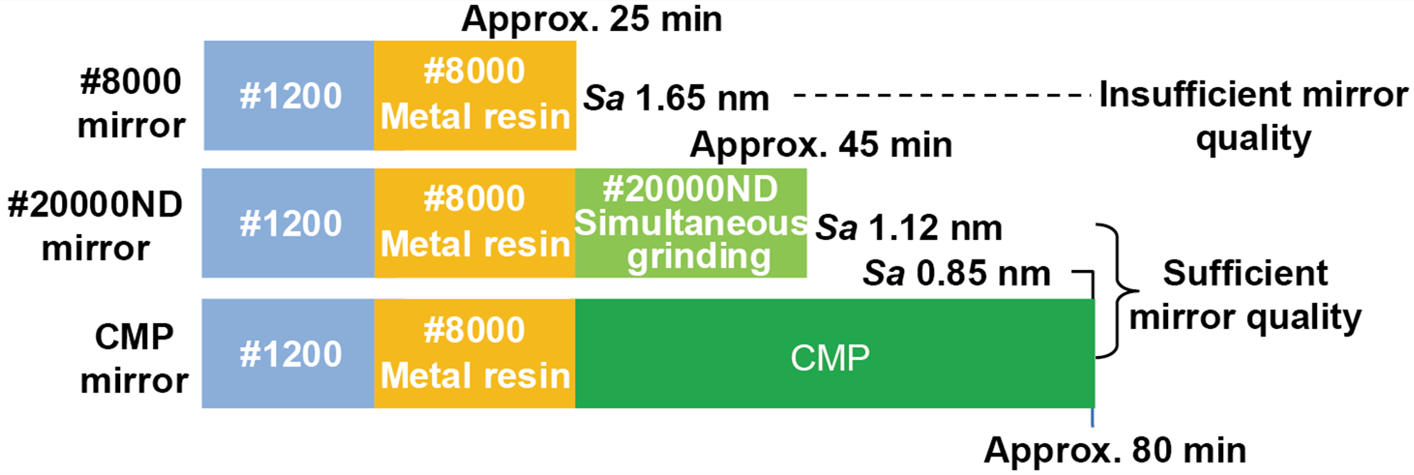
Figure 7. Process comparison for production of X-ray mirror.
5. About the Authors

Hitoshi Ohmori graduated the University of Tokyo in 1986, and obtained doctor degree in engineering in 1991. During his student hood, he invented the ELID method which has been widely used for ultra/nanoprecision machining. He also has conducted various kinds of research and development on ultra/nanoprecision machining for optics and critical components for scientific and industrial demands. Combined processes with ELID-grinding, polishing, and surface modification have been proposed through his research activities, and have been applied to produce extremely high precision mirrors for X-ray laser reflectors. In his recent research topics, micro-fabrication and ultrafabrication for micro to macro sized machining with functional surface structures at a nanometric surface precision are being conducted to realize space observatories and solar collectors, and succeeded in manufacturing large Fresnel lenses more than 1m in diameter. He proposed “Picoprecision Technology” for the future manufacturing and has launched to develop its process and machine tool.


